
Building a Monitoring Homelab for Almost Nothing
The word "homelab" makes people picture a rack. A rack with a row of blinking servers, a patch panel, a label maker, and a power bill that the household has opinions about. That is a hobby, and a fine one, but it is not what you need to learn monitoring. What you need fits in a drawer. It is one old computer, one small managed switch, a cheap single-board computer or two, and whatever wireless access point you replaced last time. Most of it is already in your house.
The trick is not the parts. The trick is the layout, because a lab that shares a network with the household will, sooner or later, break the household's network. I have built this lab four times on four different piles of old hardware, and the layout has been the same every time.
By the end of this guide you will have a parts list with no brand names on it. You will have a network layout that keeps the lab away from the family. You will have a list of things to monitor and what each one teaches, and a monitoring server to point at them. You will have a first weekend planned step by step, and a template that records what you built and why.
In this guide
- The parts, named generically
- The layout: one lab network, on its own
- What to monitor, and what each target teaches
- The monitoring server
- The first weekend
- The parts and layout template
- Power, noise, and the rack question
- The lab that grew into a second job
- The build checklist
- Where to go next
The parts, named generically
Every part in this list is described by what it does, not what it is called. The brand does not matter and the price should be close to nothing. You are looking for the following six things, roughly in order of importance.
A computer with enough memory for a few virtual machines
An old desktop is ideal. A laptop you no longer use will do, and has the advantage of a built-in battery. It needs a processor that supports virtualisation and enough memory for three or four small virtual machines at once. Sixteen gigabytes is comfortable and eight is workable. Why a Homelab Teaches What Production Cannot has the commands to check.
A free hypervisor
A hypervisor is software that runs several pretend computers on one real one. There is a free one for every desktop operating system, and for this lab any of them will do. The only feature you need is snapshots: the ability to save a virtual machine's exact state and go back to it later. You will use that more than any other button.
A managed switch with a handful of ports
This is the part most people do not already own, and the one worth getting. A managed switch is one you can log in to. It keeps a counter for every port and lets you carve the ports into separate networks. An unmanaged switch is the cheap kind with no login, and it works perfectly and teaches nothing, because it has no counters to read. Eight ports is plenty. The per-port counters are the whole reason to have it; switch port monitoring covers what they mean.
A single-board computer or two as branch devices
A single-board computer is a small, low-power computer on one circuit board, the size of a deck of cards. In the lab it plays a branch device: the thing at the far end of a cable that runs one service and occasionally stops. Give it a small web service to serve, and it becomes a target you can unplug, reboot, overload, and leave running for a month.
An old wireless access point
The access point you retired when you upgraded the house is a wireless device with a management page, often SNMP, and client counts. That is everything you need to practise the ideas in Wi-Fi monitoring. It also gets a phone onto the lab network, which is handy when you want to be the user as well as the administrator.
Optionally, a used small-business firewall
A small firewall between the lab and the house gives you a device with a routing table, address translation, and a DHCP server you can make deliberately too small. It is optional because the managed switch can isolate the lab on its own. It is worth having because it is the closest thing in the lab to the edge of a real network.
That is the list. You do not need a rack, a server-grade machine, a second switch, or anything with "ten gigabit" on the box. If you find yourself wanting those, ask which row of the goals table they serve. (The honest answer is usually "none, but look at it.")
The layout: one lab network, on its own
The lab lives on one flat network of its own, and nothing in the house is on it. A subnet is a range of addresses that belong together, such as every address beginning 10.99.0. A VLAN is a way of telling a switch that some of its ports form a separate network from the rest. Either one gives you a lab that is its own place. The reason for the separation is not tidiness. You are going to break DHCP, poison DNS, and flood links on purpose, and the household should not find out from the television.
There are two ways to draw the boundary, and both are shown in the figure. The simpler way is the firewall. The lab hangs behind the used firewall, the home router sees one device, and everything on the far side is yours. The more instructive way is a VLAN on the managed switch. The port facing the home router stays on the home network and every other port goes into the lab VLAN. The firewall route is easier on the first weekend. The VLAN route teaches more, and you can move to it later. Subnet planning covers picking a range that will not collide with anything, which in a house usually means avoiding whatever the home router already uses.
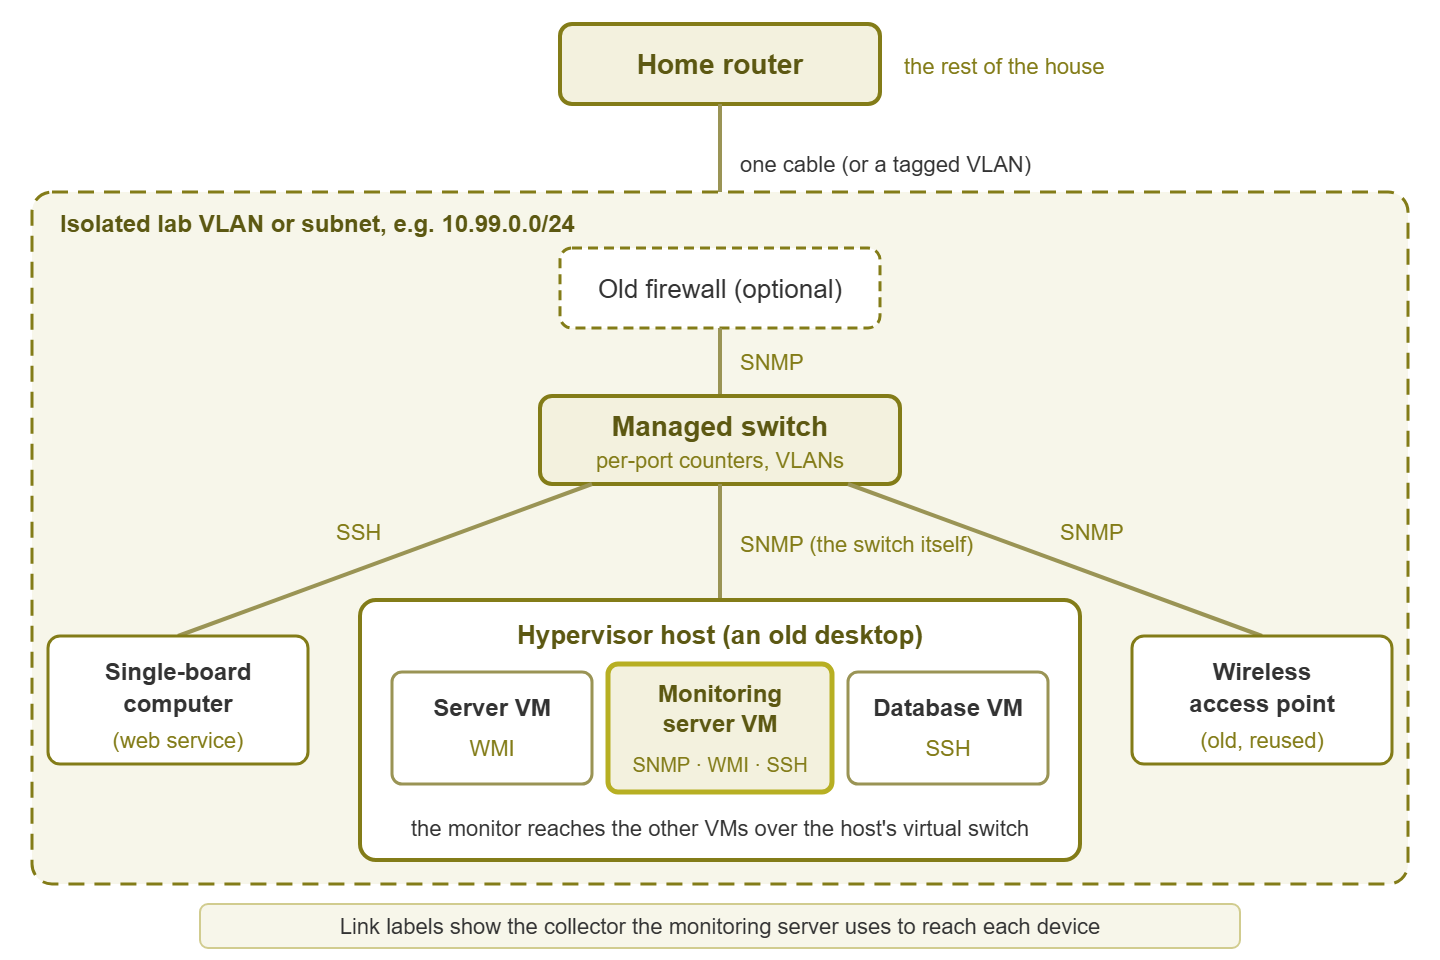
Figure 1: The whole lab on one drawing. One cable in, a dashed boundary, a managed switch in the middle, and every target reachable from the monitoring server VM by SNMP, WMI, or SSH.
The same layout as text, for the lab notebook:
Home router (192.168.1.1) ---- [lab boundary: firewall or VLAN] ---- 10.99.0.0/24

                          +---------------------+
                          |   managed switch    |  10.99.0.2   (SNMP)
                          +--+-----+-----+----+-+
                             |     |     |    |
     hypervisor host --------+     |     |    +-------- old firewall  10.99.0.1
     10.99.0.10                    |     |              (optional, SNMP)
       server VM     10.99.0.11    |     |
       database VM   10.99.0.12    |     +------------- access point  10.99.0.30 (SNMP)
       monitor VM    10.99.0.20    |
                                   +------------------- single-board computer 10.99.0.40
                                                        (web service on port 80, SSH)
Two addressing habits are worth starting on day one. Give the monitoring server a fixed address, because every other device will be told about it. Give each device a name that says what it is, such as lab-sw1 or lab-sbc1. You will type these names hundreds of times. Make them short and honest.
What to monitor, and what each target teaches
Each device in the lab is there to teach one kind of monitoring, and it helps to know which before you add checks. Here is the list, with the collector each is usually reached by. A collector is the method a monitoring server uses to ask a device for numbers.
- The server virtual machine teaches disk, memory, CPU, and services. It is reached by WMI if it runs Windows, or by SSH if it does not. This is where most of the exercises in the next guide happen.
- The database virtual machine teaches port checks and the difference between "the host is up" and "the service is answering". Anything that listens on a port will do; it does not need real data in it.
- The managed switch teaches SNMP, interface counters, errors, and link state. SNMP, the Simple Network Management Protocol, is the standard way to ask network equipment for its counters. The switch is the best place in the lab to learn it. The SNMP monitoring guides go from enabling it to walking the interface table.
- The access point teaches wireless client counts, signal figures, and the habit of monitoring a device that users blame first.
- The single-board computer teaches availability from the user's side: a web check that fetches a page and reports whether it came back, and how fast. It also teaches what a cheap device looks like when it overheats.
- The hypervisor host itself teaches that the thing underneath everything else also needs watching. It teaches that when the host runs out of memory, every virtual machine on it has a bad afternoon at once.
Six targets, six lessons, all reachable from one monitoring server over SNMP, WMI, or SSH. It is a smaller network than any business runs and a larger one than most administrators have ever been allowed to own outright.
The monitoring server
The monitoring server is a virtual machine on the hypervisor host, not a separate computer. A virtual machine can be snapshotted before every experiment and rebuilt in an hour. Which software runs in it depends on what you want to learn. A classic checks-based monitoring server teaches thresholds, alerts, and dependencies. A time-series stack teaches graphs, queries, and retention. Both are worth knowing; start with whichever your workplace uses.
A free trial of a commercial product is a fair lab install too. The product behind this library runs as a central service on one Windows machine. So a Windows virtual machine with a few gigabytes of memory is the whole install. For a lab of a dozen devices its SQLite backend is fine. A larger database is for real networks. Optional remote probes exist for reaching other sites or segments, and the lab is the one place you can try one without asking anybody. When you rebuild the lab, you keep nothing and start again, which is exactly the point.
Tip: give the monitoring server VM more memory than seems reasonable and a disk bigger than the database will ever need. A monitor that is itself short of resources produces confusing lessons, and confusing lessons are worse than none.
The first weekend
The first weekend has one goal: by Sunday evening, the monitoring server is watching six things and you have broken one of them on purpose. Everything else can wait. Do the steps in this order, because each one depends on the one before it.
- 1. Build the network. Cable the switch, the firewall if you have one, the host, the single-board computer, and the access point. Decide the lab subnet and write every address down before assigning it. Confirm from the host that you can reach each device and that you cannot reach anything in the house.
- 2. Enable SNMP on the switch. Read-only only. Use a community string that is not the default, and restrict it to the monitoring server's address if the switch allows it. Check it answers with a walk of the system group before going further.
- 3. Install the hypervisor and create the three virtual machines. A server, a database, and the monitor. Take a snapshot of each one as soon as the operating system is installed and named. This is the "clean" state you will return to.
- 4. Install the monitoring server. Give it its fixed address and confirm you can reach its web console from a laptop on the lab network.
- 5. Run discovery. Point the monitoring server's discovery at the lab subnet. Give it the SNMP community and the credentials for the virtual machines and the single-board computer. Check the result against your address list. Anything it missed, add by hand.
- 6. Add the first six checks. Add a ping to every device. Add utilisation and errors on the switch port facing the host, and disk space on the server VM. Add a port check on the database VM and a web check on the single-board computer. Add memory on the hypervisor host.
- 7. Break one thing on purpose. Pull the single-board computer's cable. Note the time. Watch the web check fail, the ping fail, the switch port go down, and the alert arrive. Note each time. Plug it back in and watch the recovery.
- 8. Write it down. Which check noticed first, how long the alert took, what the graphs showed. That entry is the first page of the exercise log.
Step one is where people rush, and it is the step that makes every later one easy. A ping sweep from the host confirms the cabling and the addressing in ten seconds. (Lab only; do not sweep networks you do not own.)
# Lab only. Which addresses on the lab subnet answer?
for i in 1 2 10 20 30 40; do
  ping -c 1 -W 1 10.99.0.$i > /dev/null 2>&1 && echo "10.99.0.$i  up" || echo "10.99.0.$i  no reply"
done

# Step 2 check: does the switch answer SNMP? (read-only community "lab-ro")
snmpwalk -v2c -c lab-ro 10.99.0.2 system
If the walk returns the switch's description, name, and uptime, SNMP is working. If it times out, the community string, the switch's access list, or the cable is wrong, in roughly that order of likelihood. Fix it now; nothing in step six works without it.
The parts and layout template
Record what you built in one table, with a column for what each part lets you practise. It stops the lab drifting into equipment for its own sake, and when a colleague asks how to build one, you hand them the table.
| Role | Generic device | Address and name | What it lets you practise |
|---|---|---|---|
| Hypervisor host | An old desktop with sixteen gigabytes of memory | 10.99.0.10, lab-host1 | Host resource monitoring; snapshots; rebuilds |
| Server | Virtual machine on the host | 10.99.0.11, lab-srv1 | Disk, memory, CPU, and service checks over WMI or SSH |
| Database | Virtual machine on the host | 10.99.0.12, lab-db1 | Port checks; host-up versus service-up |
| Monitoring server | Virtual machine on the host | 10.99.0.20, lab-mon1 | Everything; also monitoring the monitor |
| Core switch | Managed switch with eight ports | 10.99.0.2, lab-sw1 | SNMP, interface counters, errors, VLANs, dependencies |
| Edge | Used small-business firewall (optional) | 10.99.0.1, lab-fw1 | Isolation, DHCP scope exhaustion, routing |
| Branch device | Single-board computer with a web service | 10.99.0.40, lab-sbc1 | Web checks, SSH collection, cable pulls, reboots |
| Wireless | Old access point | 10.99.0.30, lab-ap1 | Client counts, signal, the device users blame first |
Keep the table in the same notebook as the exercise log and update it when anything changes. A lab with stale documentation is a small production network with all of production's bad habits.
Power, noise, and the rack question
An old desktop under a desk is fine, and that is nearly the whole of this section. It draws what a desktop draws. If that bothers you, leave the single-board computers on and switch the host off when you are not using it. Virtual machines resume where they left off. Fans are the only noise, so put the host somewhere you do not sleep. Use one power strip, not a chain of them, and that is as far as electrical advice in a monitoring guide should go.
A rack is a hobby, not a requirement. A rack is also a commitment: it wants rails, and a patch panel, and matching cables, and then a second switch to justify the patch panel. Racks are lovely. They are also the most effective way yet devised to spend a year on a lab without monitoring anything, which brings me to Meridian Parts.
The lab that grew into a second job
A junior administrator at Meridian Parts built a lab to learn SNMP. By spring it had two switches, a small rack, its own naming scheme, a wiki, and a directory service with a domain name he had chosen carefully. He could draw its cabling from memory and explain why each VLAN existed. He could not say what a saturated uplink looked like on a graph, because he had never got round to saturating one. The lab had taken every evening he had meant to spend on it. It had become a second job with worse hours and no monitoring in it. He rebuilt it as one switch and three virtual machines, and broke something the first evening.
The lesson is not that his lab was too big. It is that the lab had become the goal. Every hour spent on the lab's own infrastructure is an hour not spent watching a graph do something. If a week goes by in which you added equipment and broke nothing, the lab has started to run you.
The build checklist
Run through this at the end of the first weekend. Every line is a yes or a no, and the lab is built when every line is a yes.
- The lab has its own subnet or VLAN, and a device on it cannot reach a device in the house.
- Every device has a fixed address and a short, honest name, written in the parts and layout table.
- The managed switch answers a read-only SNMP walk of its system group, with a non-default community string.
- The hypervisor host runs three virtual machines: a server, a database, and the monitoring server.
- Each virtual machine has a "clean" snapshot taken immediately after installation.
- The monitoring server has a fixed address and its web console opens from a laptop on the lab network.
- Discovery has been run against the lab subnet and its results checked against the address list.
- At least six checks exist: ping, a switch port, a disk, a database port, a web page, and host memory.
- One thing has been broken on purpose, and the time from break to alert is written down.
- The exercise log has its first entry.
Where to go next
A monitoring lab is one old computer, a small managed switch, a single-board computer, and an access point you already owned. They sit on a subnet of their own with one cable to the house. Build it in a weekend, break something before Sunday night, and write down what you saw. Everything after that is exercises.
Those exercises are in Twelve Homelab Exercises That Build Monitoring Muscle, which assumes exactly this lab. Safe Experimentation covers the snapshots and isolation rules that keep the breaking harmless. And Carrying Homelab Lessons to Production covers what to do with what you learn. All of these are part of The Homelab as a Monitoring Practice Ground.
Put this into practice with SysPeep Monitor
For a lab of a dozen devices, the free trial at /download/ installs as a central Windows service on one virtual machine and runs happily on SQLite. Point its auto-discovery at the lab subnet and it finds the switch, the access point, the single-board computer, and the hypervisor host. It then polls them over SNMP, WMI, and SSH from one web console.
Download Free TrialLearn About SysPeep - All Rights Reserved.