
The Discovery Sprint: Mapping an Unknown Network in Five Days
You have inherited a network and nobody can tell you what is on it. Not roughly, not "about forty devices, give or take" — nobody actually knows. The old maps, if they exist, describe a building that has since been rewired twice. This is the normal condition of an inherited network, and there is a cure: one focused week of looking, called here the discovery sprint. (If you started this job days ago and haven't yet verified backups or built a credential ledger, do the first-week survival guide first. This sprint assumes you can log into at least a few things.)
The sprint is five days, each with one question, a handful of commands, and an artifact — a register — that must exist by evening. Day 1 finds the address space, Day 2 the switching fabric, and Day 3 the devices. Day 4 finds the services, and Day 5 turns it all into the first honest map. Every command here is junior-followable and read-only: discovery looks, it never touches.
By Friday you will own something most networks never get even after years of operation. Your map will be honest about what it knows, honest about what it doesn't, and backed by evidence you gathered yourself.
In this guide
- The ground rules: read-only, evidence, time-boxes
- Day 1: The address space
- Day 2: The switching fabric
- Day 3: The devices
- Day 4: The services
- Day 5: Draw and reconcile
- The five artifacts, with mini-templates
- Where to go next
The ground rules: read-only, evidence, time-boxes
Three habits govern the whole week. The first is the read-only ethos: nothing in this sprint changes the network. A useful rough test: commands whose names contain show, get, display, or list are your friends. Anything with set, write, config, or reload in it is for another week. Discovery that changes things has a different name: an outage.
The second is the evidence folder. Make one folder with a subfolder per day. And save the raw output of every command to a file named for the device and the command. Screenshot the web interfaces that have no command line. Then, in your registers, cite the evidence — "seen in core switch MAC table, Tuesday" — so that future-you can re-check any claim instead of re-doing the whole week. Discovery without evidence just produces new rumors.
The third is time-boxing: each day ends with its register updated, even if incomplete. You will not finish any day's question completely — accept that on Monday morning. An entry of "unknown" is a perfectly good entry; a register with holes you can see beats a beautiful document that silently lies. Momentum over completeness, all week.
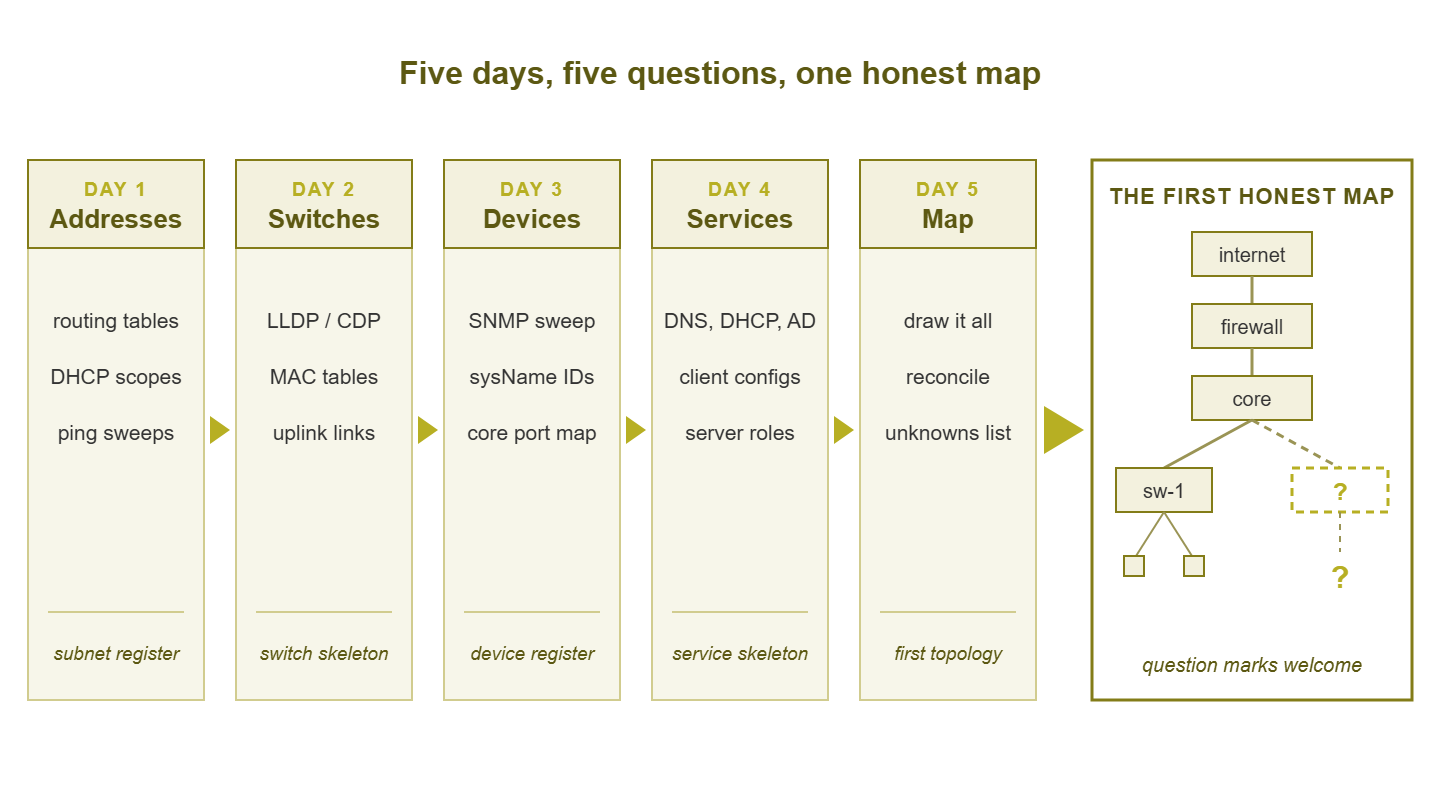
Figure 1: The sprint at a glance. Each day answers one question and produces one artifact; the week ends in a map where question marks are welcome.
Day 1: The address space
Monday's question: what subnets exist? A subnet is a block of IP addresses that talk to each other directly, like houses on one street; routers are the intersections between streets. Until you know the streets, every other discovery is guesswork, so the address space comes first.
Start at the machine you are sitting at:
ipconfig /all
That one command hands you four leads. Your IPv4 address and subnet mask define the street you live on — subnet number one for the register. The default gateway is your street's exit — a router, and routers know about other streets, so it goes on the interview list. The DHCP server is whoever handed you this address automatically — find that machine. And the DNS servers are the network's phone book — find those too. Four infrastructure leads from one command on one desktop.
Next, interrogate the routers. Log into the gateway (and any other router or layer-3 switch the credential ledger lets you reach). Ask for its routing table — the closest thing the network has to a table of contents:
# the spelling varies by vendor; most network CLIs have an equivalent
show ip route
Read the answer as three kinds of clue. Routes marked connected (or "direct") are subnets this router physically touches — certainly real, straight into the register. Static routes were typed in by a human on purpose; each one names another subnet and a next-hop address, which is another router to go visit. Routes learned from a routing protocol (labels like OSPF — a protocol routers use to teach each other the map) mean more routers are out there advertising streets. Follow every next-hop you can log into and repeat. While you are at it, list the DHCP server's scopes — the address pools it hands out. Every scope is a subnet somebody cared enough to automate, and scope reservations are a free, curated list of devices someone once considered important.
Finally, check which addresses are actually alive. Sweep each discovered subnet with a ping scan:
# gentle "who answers?" sweep of one subnet, saved as evidence
nmap -sn 192.168.10.0/24 > day1_sweep_192.168.10.txt

# no nmap available? a plain ping loop works from Windows CMD
for /L %i in (1,1,254) do @ping -n 1 -w 100 192.168.10.%i | find "Reply"
The -sn flag means "ping only, no port probing" — the gentlest form of scanning. Remember what a sweep proves: it lists who answers, not who exists. Devices with firewalls that ignore pings hide from it, and that is fine for Day 1; other days will catch them. By evening, the subnet register exists: one line per subnet. Include its mask, gateway, whether DHCP serves it, your best guess at its purpose, the evidence, and a confidence rating. "Purpose: unknown, confidence: low" is an honest Monday answer.
Day 2: The switching fabric
Tuesday's question: how do the switches connect to each other? The pleasant surprise of Day 2 is that switches already know, and will tell you. Most managed switches speak a neighbor-discovery protocol. This is LLDP (Link Layer Discovery Protocol, the vendor-neutral standard) or CDP (its Cisco-flavored cousin). Each device politely announces its name and port to whatever is plugged into it. The received announcements sit in a table you can simply read:
show lldp neighbors
# or, on gear that speaks the Cisco dialect
show cdp neighbors

# typical (simplified) output:
Local Port   Neighbor Name    Neighbor Port   Capability
Gi0/24       sw-floor2        Gi0/48          Bridge
Gi0/23       ap-lobby         eth0            WLAN-AP
Each line is an edge in your map: my port 24 connects to sw-floor2's port 48. Visit every managed switch in the credential ledger, save the neighbor table, and draw boxes and lines as you go — a paper sketch is fine. Every neighbor name you haven't seen before is a new device to visit. So the fabric reveals itself outward from wherever you start, like following street lamps. This sketch is the switch skeleton, Day 2's artifact.
The second tool of the day finds what the fabric carries. Every switch keeps a MAC address table: which hardware address (MAC — the burned-in identifier of every network interface) was last seen on which port:
show mac address-table
Read it with one rule of thumb. A port showing one MAC address has a single device on it — a PC, a printer, a server. A port showing dozens has something aggregating behind it: another switch, an access point, or a virtualization host carrying many virtual machines. Cross-check against the neighbor table. A port with thirty MACs and an LLDP neighbor is a healthy uplink you have already drawn. A port with thirty MACs and no neighbor announcement is a mystery aggregator. Very often it is an unmanaged switch someone stuffed under a desk years ago. Log every one of those in the unknowns list. Hunting them down properly is its own discipline, covered in finding the devices nobody manages.
Day 3: The devices
Wednesday's question: what is each of these alive addresses? Day 1 gave you a list of responders; today they get names, types, and roles. The fastest honest tool for that is SNMP (Simple Network Management Protocol), the standard way of asking a device about itself. Two facts nearly every SNMP-enabled device will volunteer are its configured name and a self-description:
snmpget -v2c -c public 192.168.10.2 sysName.0 sysDescr.0

SNMPv2-MIB::sysName.0 = STRING: sw-floor2
SNMPv2-MIB::sysDescr.0 = STRING: 48-Port Gigabit Managed Switch, fw 3.1
One query, and an anonymous address becomes "the floor-two switch, and here is its model." The -c public part supplies the community string — SNMP's read-only password — and public is the depressingly common default. Try the community strings you found during week one (device configs and old documentation love to leak them). Use only read-only strings — never anything with write access, per the ground rules. Work down Day 1's alive list, one address at a time or with a small loop, and save every answer to the evidence folder. When a device answers, a fuller walk tells you everything it knows about itself; the snmpwalk tutorial covers that craft from scratch.
Today's artifact is the device register: one line per device. Include address, name, type, your role guess, and how it can be managed (web, SSH, SNMP). Note whether you hold credentials for it, and include the evidence. Write guesses as guesses: "NAS? — web login page says so" is honest data, and question marks in a register are a to-do list, not a failure. Expect personality from the population. Printers answer SNMP cheerfully (they will tell you their page counts whether you ask or not). Servers usually answer something; cameras and IoT gadgets vary. Unmanaged gear answers nothing at all — which is itself an identifying fact worth recording.
Close the day with a special exercise: port-by-port on the core switch. The core's ports are the trunk of the whole tree. For each one, combine yesterday's MAC table, the neighbor table, and the closet photos into one line: what hangs off this port? The resulting port map is the single highest-value page of documentation you will produce all week. "Port 17 is the accounting file server, port 24 is the uplink to floor two" is exactly the sentence you want available mid-outage.
Be gentle with the elderly: ping sweeps and SNMP reads are light-touch, but save aggressive port scanning for later weeks. Very old devices can react badly to an enthusiastic scanner. Some elderly printers respond to a port scan by printing pages of gibberish. At that point your discovery sprint becomes extremely visible. Read-only, low and slow, is the week's speed limit.
Day 4: The services
Thursday's question: what does this network actually do for people? Users don't consume switches; they consume services — name lookup, addressing, logins, files, printing, mail. The trick for finding them is to work from a client outward. Every ordinary desktop is configured to find its services, so its settings are a treasure map you already own.
# who serves me DNS and DHCP, and what domain am I in?
ipconfig /all

# where does a well-known name actually point?
nslookup fileserver

# mapped drives = the file servers people actually use daily
net use

# where does this domain's mail arrive?
nslookup -type=mx company.example
Chase the big five in turn. DNS: the servers every client is told to ask — on Windows networks, very often the domain controllers themselves. DHCP: whoever leases the addresses (Day 1 already found it; today note what else that box does). Directory and authentication: the domain controllers. The fact that people log in every morning proves they exist. Your own client's domain settings and a lookup of the domain name will point at them. File and print: read them off mapped drives and installed printer queues on a couple of representative clients. Mail: the MX record answers whether mail lives on a local server or out in a cloud service. For each answer, add the server to the device register (or enrich its line) with a role that is now evidence-backed rather than guessed from a hostname.
Then flip your notes around and build the day's artifact, the service map skeleton. Write one line per service: the service, the machine providing it, who uses it, and what it depends on. That last column is where the interesting holes appear ("mail depends on... something called relay-01 that isn't in any register?"). Holes are Friday's raw material, not today's problem. And keep an eye out for the shy services that client settings won't reveal: a certificate authority, a VPN endpoint, the phone system. Your week-one interview notes and the closet photos often name them.
Day 5: Draw and reconcile
Friday's question: does it all hold together? Start by drawing the first topology diagram. The tool does not matter — a whiteboard photographed with your phone is a fully professional choice — but two rules do. First, every line you draw must trace to evidence: a neighbor-table entry, a MAC-table reading, a photographed cable. Second, question marks are first-class citizens. The mystery aggregator on port 9 gets drawn as a dashed box labeled "unknown switch? — 12 MACs, no LLDP," right there on the map. A map that admits ignorance is a working instrument; a map that hides ignorance is a decoration, and decorations cause outages.
Then spend the afternoon on reconciliation — checking the week's registers against each other. This is where scattered notes turn into actual knowledge:
- Every subnet's gateway address should appear in the device register. No? Then a router is missing from Wednesday.
- Every switch in the skeleton should have a device-register line with a name and (ideally) credentials. No? Feed the credential hunt.
- Every device's address should fall inside a registered subnet. No? Monday missed a street.
- Every service should run on a device you have registered. No? A server is hiding.
- Every uplink drawn on the map should correspond to a port you can name on both ends.
Each mismatch is either a mistake in a register or a genuine discovery. And both are wins — you would rather find them on paper today than in production later. Everything still unexplained lands on the final artifact, the unknowns list, with one crucial column: the next action. "12 MACs on core port 9 — trace the cable in closet B." "Subnet 192.168.40.0/24 — nothing answers, ask the alarm vendor." The unknowns list is next week's agenda, pre-written and prioritized. That is the honest engine of this whole method: unknown, to action, to known.
The five artifacts, with mini-templates
| Artifact | What it holds | The question it answers instantly |
|---|---|---|
| Subnet register | Every subnet: mask, gateway, DHCP, purpose, confidence | "Where does this address belong?" |
| Device register | Every responding device: name, type, role, management, credentials | "What on earth is 192.168.10.9?" |
| Switch skeleton | Switch-to-switch links, with port numbers on both ends | "What goes dark if this uplink dies?" |
| Service map skeleton | Each service, its server, its users, its dependencies | "What do people lose if this box dies?" |
| Unknowns list | Every mystery, plus its next action | "What do we still not know, and who is doing what about it?" |
Plain text is a perfectly good format for all five — what matters is the columns, the evidence citations, and the honesty about confidence:
SUBNET REGISTER (one line per subnet)
subnet            vlan  gateway        dhcp  purpose(guess)  evidence          conf
192.168.10.0/24   10    192.168.10.1   yes   staff LAN       route tbl + dhcp  high
192.168.40.0/24   ?     192.168.40.1   no    printers?       route table only  low

DEVICE REGISTER (one line per device)
addr           name       type(guess)    mgmt       creds  evidence
192.168.10.2   sw-floor2  access switch  ssh+snmp   yes    lldp + snmp
192.168.10.9   ?          NAS?           web only   no     mac + login page

UNKNOWNS LIST (one line per mystery)
what                            seen where           next action
12 MACs on core port 9          mac table, Tuesday   trace cable, closet B
no device answers in .40.0/24   sweep, Monday        call the alarm vendor
Where to go next
Five focused days buys you the map most inherited networks never get. Subnets are accounted for, switches drawn with their uplinks, devices named, and services traced to servers. Every remaining mystery is written down with a next step. It is not complete — no real map ever is — but it is honest, evidenced, and improving, which is worth more than complete.
The rest of the takeover builds directly on these artifacts. With a device register in hand, you finally know which configurations exist to be reviewed and archived. The guide to auditing inherited configs without breaking anything is the natural next step. And a map only stays true if it becomes living documentation rather than a one-time heroic effort; the network documentation guides cover making that stick. For the rest of the takeover series, head back to Taking Over an Undocumented Network.
Put this into practice with SysPeep Monitor
The sprint teaches you what discovery means — and then a tool can carry the load. SysPeep Monitor auto-discovers the devices and interfaces on your network and inventories them over SNMP, WMI, and SSH. It keeps live maps and dashboards as things change, so Friday's map doesn't quietly rot. The free trial runs on one Windows machine — point it at the subnets from your register and compare notes.
Download Free TrialLearn About SysPeep - All Rights Reserved.